Showing posts with label mulch. Show all posts

Sunday, May 14, 2017

Pet Peeve - Mulched Trees (aka the Coned Volcano)

So many new trees are going to be planted in the next few weeks.  I wonder how many will be mulched like this disaster:


This may be a harsh opinion, but it's warranted. Not only has the tree been planted too "proud" (meaning not level to the soil), but not only do we have the "cone" flared up mound, but we have red dyed mulch. Notice something else?  The plastic tree guard at the base of the tree is also nearly buried.

What happens to the tree trunk when mulch covers the bark?  Think about this comparison. What happens to your finger when you wear a bandaid wrapped around?  Your skin becomes soft, wrinkled and sometimes when you wear it a long time, the skin peels - right?  Well, the same thing happens to bark. Moisture, insects and possible mould will perpetually be in contact with the young bark tissue and possible suckers may develop.  Not what you need to establish a young tree.


Years later, the tree will continue to need mulch to cover this mound, like in the photos below.


To me the roots and the base of the tree would better be suited at grade - so that water can pool and collect during the heat of the odd summer shower. Snow melts quicker on these cone mounds.  Also the suns rays will bake the soil beneath quicker. Needless stresses; if only a proper planting and placement of mulch was achieved from the onset.

Below are better samples of tree plantings.

Here's why:


  • Using natural shredded bark mulch knits together. It suppresses weeds and keeps the roots cool - protecting them from the elements
  • Creating a crater in the middle ensures mulch doesn't touch the bark of the young tree


The mulch is spread to the width of the canopy of the newly planted tree. Granted, the tree will grow wider and thus the high edges (surplus) can be raked further out when the tree starts to branch out further. This is called the drip-line.


  • The crater not only helps keep the mulch away from the trunk, but when you fill a water bladder (the green bag) it helps to stabilize it. This is fantastic. If you are watering a tree on your own property, you can localize the water in the crater without it running off.
  • A lawn mower or string trimmer is unlikely to cause tree trunk damage when the tree is mulched well.


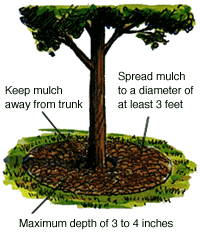
Here is a diagram resource as to how we are to mulch trees:
Diagram by: Arbor Day Foundation
Another resource:

Diagram by: Harvest Power
With all the info available, I still can't understand why mulching is still done in the volcano-cone style.

Please be aware,


Tuesday, September 13, 2016

Duckweed is a great Mulch!

Duckweed is a floating aquatic plant that just showed up one day in this pond. The plant probably hitched a ride on some water fowl which frequented the pond in early spring. Since then, Duckweed - a species of Lemna, has been gift: a floating food source for our Koi. We're thankful and allow it to do it's other thing: shade the pond - to help control algae. And it is a great means of camouflage for our frog, Kermi - who patiently waits for his next meal.


It has many aquatic benefits, but when the summer heat of August peaked 35ºC for several days and the humidity stuck around, the duckweed numbers exploded.

Too much and the pond would be overly shaded and the water lilies would suffer from lack of light. Even the Koi couldn't keep their numbers down! Gathering enough weekly, so that 1/3 of the pond was open for sunlight, I would usually skim it off the pond into a bucket and off to the compost heap.

However, I lazily tossed several screens full around some perennials and let them sit there a few weeks ago.

Going away for a few days, we realized how beneficial the dried out Duckweed became. It acted as a mulch. Retaining moisture levels and kept that section of the perennial border hydrated.

BONUS!

Now, Heidi gladly places it under Hostas, Ligularia, Peonies, Clematis....well you get the idea.


An inch or so of Duckweed knits together like a blanket of sorts, when dry. It's been ideal.

Kermi - our frog enjoys the pond as much as we do! He comes for a dinner call every time. 
Enjoy!


Wednesday, March 07, 2012

Homemade Mulch

The warmth outside today got me out in the garden. What a beautiful day!

I've decided that I will no longer buy mulch in a bag (or bulk bin) for myself. Since I have a small garden, and ample resources at my disposal, I will use what I have to make my own mulch. My aim is to have a good litter layer over my soil. Hopefully this will minimize watering during the heat of the summer and will deter slugs this spring.

Resources at my disposal:
  • evergreen boughs from my winter containers
  • pine cones (Christmas decor extras) collected from various gardens where I work
  • cuttings from my rose and ninebark bushes
  • leaves not yet composted from last fall 

Necessary tools:
Too coarse to add to perennial beds
  • sharp hand pruners (secateurs), loppers if necessary
  • my garden bin
  • time and elbow grease
For now, I've used my winter container material.  These pine and cedar boughs are not overly large, but since I have perennials, I need to break it down to incorporate it into the small space.  So, I've cut it into smaller bits.  Otherwise this size would work great under large evergreens, or in the back of a shrubbery bed. It didn't take long - just half and hour. It was a great way to enjoy the 10 degrees plus today. Spring is coming!
 
I will have more than enough for my hostas
Slugs attacked my hostas in the darker corners of my little garden, and with this pine and cedar mulch, I think I will be able to keep them at bay. (The pine needles and rough pine bits scratch slugs' skin, hopefully keeping them off my perennials.)  Once I see the Hostas peek out of the ground, I'll scatter about 2 inches of this around so once the leaves emerge, it won't be noticeable.

If you don't want to spread this mulch in the garden, cutting up your garden waste this way accelerates decomposition.  The smaller the bits, the quicker they will become compost. (Evergreen needles have a natural resin that takes longer to decompose, that's why it's a great resource for mulch. However, if you want to compost it quicker, cutting it up speeds up the process.) I used to add all my winter greens into my city yard waste bin, now the leftovers will go on my garden or in the compost bin.

Thursday, February 16, 2012

Lazy Gardener

This would be a more appropriate post for the fall, but I didn't have the blog up and running then. I guess you could call me a lazy gardener - hoping this lazy garden practice will benefit my spring season. Where I work, we have manicured gardens, and unless they are naturalized gardens, we don't leave organic mulch in the form of leaves.


I have two lovely Shademaster Honey Locust (Gleditsia triacanthos " Shademaster ") trees that are situated between my townhouse backyard and the neighbouring units. The dappled shade they provide is welcomed during the heat of the summer. In the fall they become a pain.  Honey Locust leaves are tiny and get everywhere. At first, I was diligently cleaning up after all the mess and composting them. Trying to rake them out of the garden was useless since they are too small.

Here came the lazy part: I gave up and left them in the garden.


I had to add a lot of amendment to the soil last year, since it was grass the year before. Thinking ahead for this year, I actually swept all of the remaining leaves from November onwards back into my garden and slightly worked them in.  This is a natural form of mulch and since November, much of it is decomposing already. And there I was mid-October - getting rid of them!

Hopefully I've done right and that my soil will have large organic bits of matter that will deter slugs, will be porous to retain water and will decay well enough so I don't need to add any organic manure or store bought amendments. It's a bit messy, not the greatest view, but hopefully my perennials, bulbs and veggies will be happy. We will see!

NOTE: I caution doing this if you have leaves that are infected with powdery mildew, blight and other fungal infections. These leaves had NO evidence of disease. If you do have leaves that are not healthy, dispose of them. Allowing them to compost in your garden may re-infest the host. It's not worth bringing more trouble to your garden.

Leaves are already breaking down


It great to see that they're already composting - it's only February!

Black and Decker LeafHog


If you have larger leaves from trees in your garden, you can still employ this idea. I've used great blower/mulchers like this one. It has a vacuum which sucks up the leaves, grinding up several bags worth into one bag of mulch.

Another method is to gather a small pile of leaves over your lawn. With a mulching lawn mower, mow over the pile (just not a pile mounded too high). Cris-cross, mowing more than once over the pile and you'll get a great source of mulch for perennial beds, under shrubs or material ready for the composter.

Try it next fall!

Sunday, February 05, 2012

Evergreen or Ever-bagged All Winter Long?

Going for long walks this winter, I've developed a pet peeve, basically a design irritation when it comes to wrapped evergreens and broadleaved evergreens. Seems to me that an evergreen is an EVERgreen and should be seen and enjoyed all year long.
I see burlap, boxed contraptions, bags, just about anything someone could use to wrap their plants. In most cases this is unnecessary if we examine alternatives and proper placement of plant material. It's unsightly to see your front yard draped in burlap each winter. Especially when there could be wonderful evergreen foliage - the only green colour available to us at this time of year!

These are roses.
I would first like to say, I am not trying to put folks down who do this: some are doing it as an effort to sustain the plant during our harsh winters, or others do it to insure a delicate shrub/evergreen establishes well enough for the first few years. It is a great practice and rule of thumb to protect when establishing new plants. However, the bulk of these photos are examples of wrapped evergreens and shrubs that have been wrapped every winter since they were planted.

I merely want to suggest and to make people aware - there are other alternatives to evergreen selections for the front of the garden. There are ways to avoid bagging plants that are meant to be enjoyed all year long. Your front garden doesn't need bagged or boxed eyesores.
Euonymus Broadleaved evergreens

Much of the evergreens I see wrapped are Dwarf Alberta Spruce; Picea glauca ' conica ', Rhododendron;  Rhododendron catawbiense (large flower and leafed variety), Boxwood varieties; Buxus x and bonsai topiaries. They are wonderful plants to add to the front yard, but if you have to wrap them each winter for the rest of their days, I believe they are in the wrong situation.


Dwarf Alberta Spruce. Most front yards have them. They're compact, look like a perfect little pudgy Christmas tree. They don't require sheering and they stay dwarf and don't take over the garden. Let's examine what they need and see if your front yard is right for it's longevity without wrapping.
  • They prefer full sun and a slightly protected spot (away from North/West strong winds). 
  • They can tolerate part shade, or dappled shade. However, too much shade and their tight branching and needle foliage habit will begin to lose shape. 
  • Slow growing, but still requires adequate spacing away from other shrubs, walls and walkways. 
  • Will struggle with root competition, so plant in rich, deep soils.
Dwarf Alberta Spruce
Most are planted too close along walkways, driveways and entrance points when the spruce is small - not taking account a mature growth rate. Front gardens are usually exposed, they have walkways and driveways which are either sprinkled with salt or heaped full of snow along the pathway. Salt damage will brown the needles. A common reason why folks wrap their evergreen.

Many Dwarf Alberta Spruce are planted along the brick wall of the house. You may think this is be a protected spot for them, but during the summer, especially if they are planted too close to a south facing wall, their situation may be compromised. Brick walls exposed to the sun will absorb heat and hot temperatures will essentially bounce back and bake the Dwarf Alberta Spruce. The heat becoming intolerable over time. Month after month of this can lead to needles drying out at the back of the spruce, nearest the wall. This stresses the little conifer, making it struggle going into the winter. It may be warmer during the winter but the damage throughout the summer compromises the evergreen.

Other alternatives to Dwarf Alberta Spruce: 
  • Clipped Pyramidal Yew; Taxus cuspidata
  • Blue Arrow Juniper; Juniperus scopulorum ' Blue Arrow '
  • Fairview Juniper; Juniperus chinensis ' Fairview '
  • Conical Boxwood; Buxus koreana or x species clipped
  • Emerald Cedar; Thuja occidentalis ' smaragd '


Rhododendrons are usually placed as a focal piece, tucked in a dark corner where their blooms want to energize a gloomy shaded spot.  However, Rhodo's require more sun than most realize. Dappled shade and or part shade is best to optimize bloom. What they mainly require to become robust, is a deep, loose, rich low (acid) pH soil. This enables their fibrous, lateral roots to retain moisture so that their buds and broad leaved foliage remain hydrated over the winter. Here's what Rhododendrons like:
  • They love rich loamy soil, with added peat moss and leafy matter (compost, pine/evergreen needles, or mulch) on top for a cushion of protection. 
  • Deep watering before the main freeze up in November and a good pile of snow underneath should be plenty if the Rhodo is situated away from sweeping winds and a sharp north west exposure.
  • Other shrubs and taller evergreens or a fence close by to act as exposure protector, buffering the prevailing winds.

Other alternatives to Rhododendrons:
  • PJM Rhododendrons (hardier variety than the large leaf Catawbiense; Rhododendron x ' PJM '
  • Dwarf Korean Lilac (sunny spot); Syringa meyeri ' palibin '
  • Annabelle Hydrangea (shadier spot); Hydrangea arborescens ' Annabelle '
  • Azalea (deciduous Girard species), Azalea hybrida x girard series

Topiary and small Rhododendron

If you have a well established evergreen that would be hard to transplant, and if you must wrap for fear of losing it - try burlap that is dyed green!


Here are ways to avoid using burlap or coverings:

1) Avoid using sensitive evergreens and salt intolerant plant material near:
  • walkways
  • driveways
  • or up against brick walls
  • tree trunks with heavy root system

    2) Summer to late fall prevention and preparation:
    • water and soak your evergreens and sensitive plant material before main freeze up (just before you turn the outside water source off)
    • wrap conical conifers with twine, so that the branches are held tightly together. This gives them a sturdy shape and avoids weight damage from heavy snow and provides less wind from passing through branches
    • give them a good sheer and cut in late summer, allowing any following growth of foliage to be tight in habit and yet fully hardened off before the winter
    • add organic matter and mulch (sustains moisture levels, helps prevent drying out from freeze to thaw and adds decomposing materials, enriching the soil over time) 
    •  for roses, cut back long straggly canes to halfway - preventing them from drying out. Mulch and or use a rose collar at the base of the rose crown to help winterize the grafted point near the soil
    •  
      3) Research your plant material. Look for hardiness zones that are much lower than your geographical zoning. The hardier the plant, the more apt it is to handle our tough winters.

      4) Examine your area for sweeping winds and strong exposures, avoid planting near them and or find ways to shield them with other tolerant plants.

      Using stakes and wrapping only the sides for salt protection.

      Finally, if you must wrap your plants near walkways, shield them rather than fully wrap them from top to bottom. Stake on each corner and wrap material around the plant tightly. That way snow, moisture and sun can reach the top of the plants. This helps to sustain them and allow good air circulation when temperatures fluctuate. For smaller establishing evergreens (like boxwood) try these NuVue's: plant covers . Much easier and less of an eyesore.
      Many sizes to buy here

      Related Posts Plugin for WordPress, Blogger...