To show the progression of flowering, I've photographed this plant over a period of two months.
I have four different cultivars of Sempervivums in this container. I use it as a decorative planter for our patio table. It's been doing so well. I've taken many baby plants from it already and placed them in our garden and also given some away.
Early July - 3 flower stalks full with buds began their ascension upwards.
Flower buds tightly packed in. They are so incredible. Beautiful design.
Each bud reveals a lovely star shaped flower. Pollinators love them!
Two weeks later, they keep opening and ascending further.
Each flower lasts a long time.
Two more weeks later and they are still blooming!
Another two weeks later and you begin to see the flower stalk begin to fade and rot from the base.
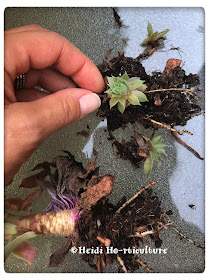
I removed some of the rotted leaves from the base - so you can see what's happening. You'll see a ton of roots and stems, with little "chicks" still attached.
You could keep this flower stock going for as long as you'd like, but given this is on my patio table and because it's mid-August, I decided to take action and remove the parent plant so that I can deal with the empty spot. I want the warm months to help make sure this gap is filled so that it's good going into the winter.
It came free rather easily - few roots still attached. My trowel sliced through and the stock came away.
At the base, examine and look for baby "chicks" attached. Save these!
Tidy up the area and get rid of rotted leaves. Leaving these may cause further rot on little plants. We want to preserve as many as possible.
Take the little "chicks" and cut back some of the stem so that it can lay down and begin to set those roots. Arrange with some gaps between.
You don't have to plant them, but laying them firmly on top, will do.
Some will produce better roots by just laying on top of the soil. I've laid three "chicks" on their sides, to use in my rock garden. They will send out more roots on the side and then I can transplant them elsewhere.
Ready to start the process all over again.
Pretty simple.
One trick with Hens and Chicks - removed decayed base leaves. It helps prevent plants rotting at the base. This summer has been quite wet with regular rain. I just find: when you remove these leaves regularly, the plant-lets remain happy and set roots faster.
Enjoy!


Thanks fif the info I presently have my own just starting to bloom
ReplyDeleteWow! You’re amazingly helpful! The details with pictures is exactly what I need to do this right! I appreciate all your time and effort put into this post!!!!
ReplyDelete